Recently I picked up a refurbished Nook on eBay for a bargain price. The idea was, to turn it into my ideal e-reader tool. I chose the Nook Simple Touch as my base unit. Basically, because it runs Android in the background, so it gave me lots of options for rooting it. I didn’t want to be tied to any one book store, and I wanted the ability to read long internet articles on it too, which I tend to save to Pocket.

Please be aware that the following article contains affiliate links.
E-readers are great, and in particular the Nook. Their crisp e-ink screen is as good as reading a book, and with the ability to expand the memory using SD cards, you can carry around a complete library wherever you go. Perfect for ample leisure reading material, reference books etc. I am considering digitising my engineering reference books so that I can keep them all in one place, whether I am in the office, or visiting customers.
I found a great article on how to root my Nook, by Alan Henry at Lifehacker. However, this was an older article and I ran into several problems along the way, which weren’t addressed. The method chosen by Alan was based on Nook firmware prior to FW 1.2.0, which the Nook I bought has installed. Following Alan’s step-by-step instructions didn’t work, but then I found another article on XDA Developers, which gave me enough information.
What You’ll Need
I’m going to describe the particular process that I used. Other systems may be different, and I am happy to expand this article over time with snippets from firmware other than 1.2.0 and other computer Operating Systems.
- A Nook Simple Touch with Firmware 1.2.0. You can pick one up from Amazon for about £79. I believe that this will also work with FW 1.2.1 also, but I have not tried it. Alan’s Lifehacker article describes the process for Firmware earlier than 1.2.0, so if that includes you, then I recommend you read this article in conjunction with Alan’s.
Update: Currently the Nook Simple Touch is on offer at £29. Last I heard, the Nook Store had sold out, but there are some in stock at Currys (affiliate link). You can also get cashback through many stores stocking the Nook by signing up to TopCashBack (UK only I think). - A micro SD card. I actually used 2. I had 2 spare left over from older phones – a 2GB one and an 8GB one. For performance, a number of people have found significant increases in performance with Class 6 or higher, so if you are buying new, then that might be something to look out for. Amazon sell a 16GB Class 6 Card for about £8. In my instance, I used the 2GB one for rooting and installing items on the Nook, and the 8GB one is my standard storage device for storing books on. To root the Nook, you only need 1 SD card, I just happened to have 2 lying around.
- An external micro-SD card reader. I tried using my laptop’s built in SD card reader, but I couldn’t get Win32DiskImager to recognise my SD card. However, it worked fine with the external reader. You can pick up one at Amazon for about £1
- A computer running Windows. This is just the computer I used. It was my laptop, running Windows Vista. There will likely be equivalent software available on other OS’s – feel free to leave your suggestions below in the comments
- Nook Manager – this is what is known as a Nooter, which is a utility for rooting your Nook. For FW 1.2.0, you have to use Nook Manager. I tried TouchNooter initially, as Alan did in his article, and it ended up failing. I had to do a factory restore to recover it – after a good 10 minutes of panicking.
- Win32 Image Writer – you’ll need this to write the disk image to your SD card.
- A Google account. There seems to be a recommendation that this is the same account that you use for your Barnes & Noble account, but I can’t confirm that not doing this makes it any more difficult, as mine was the same anyway
Setting Up Your Nook for Rooting
OK, obligatory warning before you begin. There is a chance you will brick your Nook. Rooting is not a practice condoned by Barnes & Noble, and it WILL void your warranty. You are following the instructions below at your own risk.
- Connect your SD card to your PC using your external card reader. Do not connect it to using your Nook and a USB cable. A number of tales of Nooks being bricked have been attributed to using this method to write the disk image. I found that using the internal card reader in my laptop didn’t work with Win32 Image Writer. Confirm that the SD card is mounted to your computer.
- Download and extract the Nook Manager image file to a location where you can find it. I used the desktop – which I usually keep clear of icons! I must be getting lax in my old age.
- Extract all the files from the win32 Image Writer archive into a folder. Double click win32DiskImager.exe and it will open up the program as shown below:
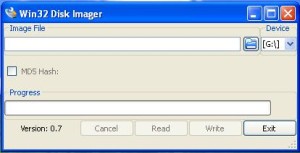
- Point the “Device” drop down to the drive letter assigned to your SD card. This was automatically selected for me, so just check it is pointing to the write device. The last thing you want is to over-write the wrong card. Make sure you have backed up anything on your SD card that you may want by this stage.
- Hit the folder icon and browse to the Nook Manager image file.
- Once you are happy, hit “Write”. This will wipe your SD card and write the image file to it.

And that’s all there is to the first stage. You are now ready to start rooting your Nook.
Rooting Your Nook
As a bit of pre-setup to rooting your Nook, I made sure that I had already setup a wireless network to connect to within the Nook.
- Power down your Nook (by holding down the power button for a few seconds) and insert your newly created SD card with NookManager on. Turn the Nook back on. It will now show the boot screen, then after about 15 seconds you will have the NookManager menu up.
- The next screen asks you if you want to turn on wireless. If you have setup wireless as I discussed before, then select yes. If not, click “No, continue without wireless”.
- Once it has done its business connecting to the network, you’ll get the main menu. Select “Root” – this was in the bottom right for me.
- Then select “Root My Device”. It will chug away for a few seconds and eventually say “Success”. It may come up with a message about automatically rebooting once you remove the SD card. Do this and once you reboot, you will have a fully rooted Nook.
- You’ll have to sign in to your google account now – its suggested elsewhere that you should use the same google account that you have signed up to Barnes & Noble with. Whether this makes a difference or not, I don’t know.
Making Your Rooted Nook Awesome
So, now you have a rooted Nook, how can you make it into the monster e-reader that you dreamed of. There are several apps that I have installed so far.
- Google Market – this was installed using NTGAppsAttack
- Dropbox – useful for getting books and files across to your Nook Simple Touch. I also used this for sideloading some apps
- Amazon Kindle – I had already bought some books in Kindle, and it just feels a little bit perverse using a Nook to read Kindle books! (Update: I used v 3.0.1.70 available here – you’ll have to sideload it to install it)
- Read It Later – for reading articles saved for later reading from various devices
- NewsRob – RSS feed reader that syncs to Google Reader
To date, that is all I have installed on my Nook at the moment. If you have any suggestions for other apps, or comments regarding other ways of rooting your Nook, then please add it to the comments below.
UPDATE:
Here is a selection of tips which people have added to the comments. Thank you everyone for your contributions:
To Re-Assign The Buttons (Courtesy of Chris)
To resign the library button etc if you’ve made a mistake, do the following:
- Go to “All applications” and select “Nook Touch Mod Manager”.
- Select “Modify Button Action”.
- Swiping the screen, go down the list until you find the “Quicknav” section.
- Select the Home, Library, Shop, Search or Settings button you wish to change the default function for and press the down arrow to the right.
- Select the function you want to assign to that button and viola 🙂
A Good Way To Setup Your Launch Buttons (Courtesy of Steve)
ReLaunch allows the actions of the Nook Button to be re-programmed. As installed, ReLaunch comes up rather too easily for my liking.
I programmed as follows:
n, Home –> Home
n, Library –> Library
Long Press n –> Relaunch
This makes the Nook very much like the original with the “hidden” feature that a Long press on the n gives you the extra stuff that rooting gives.
Once Long Press is set up to enter ReLaunch…
At some point you have to say which application you want to complete the action with. Check the box for “always” and select the standard browser for Home and Library. That way it looks very much like an un-rooted Nook to the casual observer.

Can personal documents (files emailed/uploaded to Kindle account) be read on the rooted Nook Simple Touch?
Yes, the rooted nook can operate just like any other android tablet – although you may not be able to use the latest versions of some software.
Hi, is there a way to change settings so that when it turns on it defaults to opening the original reader mode?
I cant find the setting with the “always do this” check box, which i suspect is the setting for this!
Also, its a shame read it later app no longer works. If anyone has a fix for that too let me know. Thanks!
I was not asked to sign into my google account. Does this happen automatically, or do I need to select something?
Do you mean signing into “android” or into Barnes & Noble?
I had already signed into B&N before I rooted, so didn’t have to do it again.
As part of opening up android I was given the chance to sign in to Google.
If you weren’t though, you should be able to through the settings menu
I also wasn’t able to log into Android and I can’t find it in the settings menu. I’m not sure whether I should continue with trying to install anything else until I know I’ve got it right. I have tried rebooting and run the root again.
I have the same problem. I can’t figure out how to sign into Android. I’m never offered that option. The only options I’m offered upon start up are whether to proceed to “Home” or “Relaunch.” Let me know if you figure this out!
I’m experiencing the same thing. I was never given an option to sign into Android. When i restarted the device, it prompted whether to proceed with Home or Relaunch
Ok, I feel a bit silly. I just installed NTGAppsAttack and have now been prompted to login to Google. Googlet Market (Play) is now there as well. All is right in my world. 🙂
THANK YOU SO MUCH FOR THIS ARTICLE!!!
Does this work on version 1.2.1?
Hi Juan. From what I’ve read, yes it will work with 1.2.1, but the one I did it on was 1.2.0. If you try it, please could you post back with your results?
I can confirm, more than a month later. >.> (Stupid school…) Anyway, I just followed your steps to the letter (with the sole exception of your recommended apps) and it worked flawlessly… after I actually took the time to read the instructions on the NTGAppsAttack post. >.< (I first didn't unzip the package onto the SD card at all, then I unzipped it into its own folder instead of "Extract Here"… Derp!)
Thanks Courtney – its always nice to get confirmation from readers!
I used this method on 1.0.0 and it worked fine. The Nook autoupdated to 1.2.1, lost the rooting, and I just booted from the MicroSD I had from earlier in the week and it worked again.
Thanks for the great instructions.
I was able to root the Nook just fine, but I cannot for the life of me install the NTGAppsAttack. According to their forums, there is a “more” –> “custom” —> “install”, but that doesn’t show up anywhere for me!
Hi Mike,
Sorry for the delay in replying, I’ve been away for the last few weeks.
Have you got any further with this? First things I would check are that you have successfully rooted your Nook and that (probably more importantly) your versions of NookManager and NTGAppsAttack match, as detailed at http://forum.xda-developers.com/showthread.php?t=2086582
Everything appeared for me as it should when I installed it.
I had the same issue at first. Did you “Extract Here” after copying the .zip to the root of your SD card?
Mike. I also had the same issue repeatedly. Kept trying to re-root but the same issue. The versions of NookManager and NTGAppsAttack did match. Did anyone find a way of solving this riddle of the missing ‘install’ once you clicked on ‘custom’?
Have you been able to install Aldiko on your rooted Nook? I really like the app, and the LH article’s author says he recommends it, but when I go to install it the Market on the device can’t find it, and from a computer it says “this device is not compatible”. Is it one of those apps that needs side-loading?
I haven’t installed Aldiko (yet!). For PDFs, I’ve just been using the inbuilt Nook reader. On my phone I use Mantano, so I’m pondering whether to try and install that – I’ve found that that is the best for converting PDFs into a more readable format on a smaller screen. However, I haven’t checked yet for a workable version on the rooted Nook.
With regards Aldiko, I’ve heard that version 2 definitely works, although at the time of writing, Whitson Gordon (Lifehacker) seemed to imply that it installed OK from Google Play.
I’ll maybe have a play tonight.
So the built-in Nook reader app doesn’t disappear when you root it? That’s good news, if that’s the case – that’s one thing that’s stopped me from rooting mine, as I actually don’t mind the default reader and would like to keep it.
Nope, it doesn’t affect the applications already on board at all. It gives more options when using them as well as the ability to load other stuff.
The only thing I wish Nook Manager included was a way to make the home ReLauncher view the application folder instead of the file tree. Other than that God and doesn’t seen to boy down like my PRS-T1 did after rooting.
Root away!!
That’s great news! Finally being able to share my books to the device wirelessly will be an enormous boon.
Hi, I have a silly question but do I need wireless to root the nook? I am assuming that once I have the downloaded files I can simply write the image onto an sd card and then simply insert the sd card into the nook and away I go, is this correct?
thanks
Hi Sam,
Yes you should be able to, but you won’t be getting the full benefit from the Nook, by not connecting it to a network. Forgetting about all the benefits of rooting the Nook, such as connecting to Dropbox, being able to read your Newsfeed, checking your emails etc, it will also mean you won’t be able to connect to the Nook store (or any other store, such as Kindle), in order to download books.
However, you will be able to put books on an SD card and read them from there.
Can I ask a stupid question? Once this is rooted will it have the exact home screen as a regular nook when powered up or will it seem like an android device and the nook part needs to be started. I want to keep things as simple as possible for my wife when powering up the device
Yes… and no.
When you press the “home” button, you will get a choice of going to the regular Nook homescreen, or going to the rooted homescreen.
Thanks Matt, I’m sure based on the sales of nooks in the UK your page has probably been viewed by a lot more people!
My rooted nook comes up with a choice of ‘Home’ or ‘ReLaunch’. Which one should I use?
Oopps Sorry – just seen thread below….
ReLaunch allows the actions of the Nook Button to be re-programmed. As installed, ReLaunch comes up rather too easily for my liking.
I programmed as follows:
n, Home –> Home
n, Library –> Library
Long Press n –> Relaunch
This makes the Nook very much like the original with the “hidden” feature that a Long press on the n gives you the extra stuff that rooting gives.
Once Long Press is set up to enter ReLaunch…
At some point you have to say which application you want to complete the action with. Check the box for “always” and select the standard browser for Home and Library. That way it looks very much like an un-rooted Nook to the casual observer.
Hope that helps…
Just did this on my Nook – brilliant tip, and makes it much more intuitive to use, thanks!
… also a long press on one of the navigation buttons –> Browser works well for me. I tried Opera Mobile Classic, but Opera Mini seemed more suited to the Nook…. apart from some irritating menu animation. Does anyone have any other recommendations for particularly suitable browsers?
I also set up a different version of my home page (i.e. shortcuts) for the Nook. Still have some optimisations to do, and removal of links that don’t really work with the Nook, but the basic idea seems to work quite well. It is at nook dot stevechampion dot com if anyone wants to take a look and copy ideas and build upon it for themselves.
I did it =) Mi Nook is 1.2.1 and all worked fine. Now I´m waiting for the Market to work properly.
Do you know if Mendeley (or something like that) work in nook?? I Have a lot of PDF´s to read.
PD: I´m checking Mantano. i didn´t know that.
Greetings from Mexico
Thanks Iris.
I haven’t heard of Mendeley before, but after a quick google, I might check it out.
For those interested, http://www.mendeley.com/.
Looking into it, there is no official android app, but I suspect you can browse it on the web. If you have installed Opera on your rooted Nook, then you should be able to browse the website/web app.
Feel free to report back how you get on 🙂
PD2: Thanks a lot!!!!!
Hi Matthew. After rooting, how can I restore my Nook back to stock?
Hi Jane,
I had a problem with mine while I was rooting it and wanted to restore it back to stock. I followed the instructions here.
I can’t find the answer anywhere, and all the reviewers on youtube are so superficial…I want to know if the kindle app can download the dictionary add-on oxford to be used within the app. i.e. .long pressing a word.
Can you do this?
Hi Sarh,
I’ve just checked in the version of the Kindle app I have installed on my Nook (3.0.1.70), and yes you can.
Would it be possible to download a foreign-language dictionary add-on to be used like the built-in Webster’s?
I’ve just done this. I’ve only got the options if home and ‘relaunch’ once rooted.
This doesn’t take me to the android home screen..
Alex, AJ and gt,
Relaunch is the launcher that is installed as part of the rooting process. The nook is a low spec device with what is effectively a slow, black and white screen. The Relaunch launcher is designed for a minimalist, high contrast (i.e. black and white) screen.
Once you are in Relaunch, you can still access all your apps etc, through the app button (bottom centre) and your notifications still appear at the top. What you don’t get is fancy animations and widgets, because the hardware just isn’t up to the job. Rooting the device is enabling the functionality that is hidden behind the scenes.
Also worth pointing out is that it is also running a much older version of Android. There’s none of your Jelly Bean, or Ice Cream Sandwich here unfortunately – the device just isn’t capable of it.
as above – just rooted following your guide and i dont seem to have android home screen…
As above. No option for Android home screen. Please help. Thanks
Thanks Mathew. A lot of clarity now. I had not registered my nook with B&N when first started. But have also rooted it per your instructions without this registartyion.
How do I do it now? Just need to install Google play and Kindle app. Can you pl provide an idiots guide?
Thanks & much appreciated.
GT, I’ll look into writing up a quick guide as a future article. First thing is installing Google Play using NTGAppsAttack (see the link above).
I think I installed Kindle straight from Google Play.
As for registering the Nook, post rooting, I’m really not sure on that one. There may well be a setting if you go into the “Nook” homescreen and settings (rather than relaunch). I may be able to check this out soon, as my Wife has just ordered a Nook herself, so I may be able to have a play on an unregistered one!
Thanks a lot, but it came to the stage where I could not even get into the regular nook homescreen. It always starte wiht the relaunch screen. So stuck there for further options.
Regds
What happens when you hit the “n” hardware button and then home?
It just gives the home page of Re-launch. Thats it . ANy further ideas to maybe start all over again ?
Thanks in anticipation.
I’m guessing that you ticked the box to say “remember my choice” at some point. If that’s teh case, there’s usually a setting somewhere that resets your default selections. However, I’m struggling to find it on mine.
So, there’s 2 other options.
1) Find another launcher within Google Play / The Market and install that. Whilst you might not want the other launcher, it will have the side effect of resetting your default choice and you can choose again.
2) Reset your Nook back to the “factory settings” following this guide here
Thanks for the great guide.
Could you tell me how you managed to get pocket to work on the device. My understanding is that you have to install a much earlier version. Is this correct?
Hi Craig.
Thats right, you have to go back to when it was called “read it later”. This is the version I installed:
http://www.apktops.com/read-it-later-pro-1-3.html
You have to sideload it (i.e. transfer it onto your nook manually and then install it like you would install a program on your PC).
Do you have any issues swiping up or down to scroll through articles using ReadItLater? I find sometimes it pages up when I want to go down and vice versa. I wish I could use the hard buttons!
I have the same issues. I am not able to use physical buttons to navigate through pages.
Does anybody know any solution?
Same here, a solution would be greatly appreciated
Hi. Thanks for this guide – root done, have yet to install GApps (so no Play store etc.) but will try this evening. I did try to install Dropbox from the Amazon Appstore, but it stated access was not available in my country and even the Kindle App didn’t show up in the search. I had successfully logged in to Amazon Appstore and have no problems using it on my phone.
i have the same issue….how did you over come this or are you still having issues?
I’m having problems uploading the NTGAppsAttack file.Using win32diskimager but its not working.I’m new to all this so maybe I’m doing something wrong…any help??
Its OK,got it working now.Just sent it to SD card instead.Fully rooted now,thanks a million,great work!
Good to hear, Toby. Enjoy your newly rooted Nook!
Hi
Does skype works on this and if it can be downloaded from Google Play market?
Thanks
Hi Khan. The Nook Simple Touch doesn’t have any audio capabilities (no microphone, speakers or headphone socket). Also, the e-ink display isn’t capable of video, so you won’t be able to use Skype on it.
Actually, perversely the answer is probably “Yes”. There are, perhaps, times that it might be useful to use the text chat feature of Skype – but of course, no audio or video. I have not tried downloading it, but my Google Play account claims compatibility. Wouldn’t surprise me if some version of Skype (perhaps a very old one) could be made to run on the Nook for text chat.
As a more general point… there are lots of things that you CAN run on a Nook for the fun of it – but not too many applications that make sense if you are carrying a smartphone in your pocket. I have maybe 20 or so Android Apps on my Nook – but I don’t really use more than a couple.
This is brilliant. Thank you very much! Turned my cheap e-reader into a really rather versatile device!
Thanks Adam. Knowing that people are benefiting from my site really inspires me. Cheers.
how can i reassign the library button ? I chose the wrong option and clicked remember my choice …..
Alan & GT,
I’m guessing a bit here, but if you go into the settings via the top right button in relaunch, then there is an option to “reset settings to default values”. No promises, but this *may* fix it. Otherwise, I’m stumped.
Thanks for a great tutorial… I now have a £29 WiFi enabled Android tablet with fantastic battery life 🙂
Even Google Maps etc is very useable 🙂
To resign the library button etc if you’ve made a mistake, do the following:
1) Go to “All applications” and select “Nook Touch Mod Manager”.
2) Select “Modify Button Action”.
3) Swiping the screen, go down the list until you find the “Quicknav” section.
4) Select the Home, Library, Shop, Search or Settings button you wish to change the default function for and press the down arrow to the right.
5) Select the function you want to assign to that button and voila 🙂
Enjoy 🙂
Just wanted to say thanks for this, the instructions worked great… and to pass on an additional bit of good news: The Nook Simple Touch is available right now at Walmart for only $59!
Hi, i tried to download Kindle_3.0.1.70.apk and load it into my nook using Dropbox but it does not work. It kept saying “storage full or unavailable” ? Could you advice me on what to do?
Cindy, have you got an SD card installed, with some free space on it?
After “bricking” it 3 times with lifehacker, I found your very handy and well written article. I now have a Nook that I paid £29 ($44) for (I actually bought 2 at that price).
One question though – is there a way I can remove some of the Android base apps that are there, such as the dialler, to save resources?
Not that I know of, but I’ll try and have a look
Another question, to which I’m struggling to find a response for, is how to update (if you can) the Amazon Kindle app on the Nook as it won’t let me download the book I’ve bought 🙁
Hi. I’ve followed the instructions to install the market, but I get certificate security warning when I go to play.google.com via the browser. Is this normal???
Not tried that. Why do you need to use the browser, does the market app not work ok?
Does anyone have experience customising Kindle on a rooted nook simple touch to achieve the following
1. Use the hardware buttons for next page/previous page
2. What directory do I use for side loading .mobi books so Kindle can see them
Thanks in advance Paul
Poor form to answer one of my own questions but it appears Kindle will look for .mobi files in /sdcard/Kindle directory.
I would still like to be able to use Nook hardware buttons to progress through the book….
I don’t use this method, but I read that you can use the Mod Tools (I think they’re called “Nook Mod Tools” in the application launcher) to assign volume up/down to one set of buttons, I think.
Then set the Kindle app to use volume up/down to turn pages.
I set them to “Back” and “Menu” (on the left hand set) as that’s more useful to me. The change is persistent though, so you “lose” the buttons for doing anything else in the other applications too.
James TW – I had the exact same problem, downloading and installing the Kindle app from the play store, didn’t let me download books.
I uninstalled that version (and regregistered my device from the amazon website) then sideloaded and installed v3.0.1.0 – after that installed, I did a sync, and all my books came down to the device 🙂
This website has all of the previous versions of the kindle app for you to download:
http://www.freewarelovers.com/android/app/kindle
Hope it helps !
Cheers – how do you side load?
And typically, I’m in the office without my Nook today. Argh!
I downloaded the kindle app and put it into a microSD card. as soon as you put it back into your nook, you can see the file and you can install it. I hope it helps!
Another question re the Kindle app – that link is only showing 3.0.1.70 – Will that work?
Hi
Does this process change for a mac? I’m a mac-user/technophobe..
Thanks!
You’ll need some sort of program to write images to an SD card. I haven’t used a Mac in at least a decade, so I wouldn’t know where to start. A quick google should help, unless anyone else on here can help out?
None of those Kindle versions work 🙁
I take it back – they do, just not all content works 🙁
Hmmmm, have you worked out what content does and doesn’t work?
Peter Rabbit and Alice in Wonderland work but Mr Greedy (a Mr Men book) doesn’t. Odd
Has anyone experienced problems with trying to turn the NST back on after inserting the micro SD card? I turn mine off, insert the card and attempt to switch it back on, but no luck.
It’ll only turn back on once i’ve removed the SD card.
Can I install games like temple run in my rooted nook device??
You can probably install some games, but be very aware of the graphic limitations of the Nook!
can i use my nook, then root it in about a months time?
That shouldn’t be a problem. I registered my Nook first and then rooted it. You still keep all the Nook features – its like adding (or unlocking) an extra layer to your Nook.
I’ve installed Kingsoft Office too which lets me view and edit Office documents that I usually transfer with Dropbox.
Am loving my Nook this way 🙂
just rooted with your guide, nice and easy thank you 🙂 but……can not access amazon app store as it says ‘the amazon appstore is not yet available in your region’ any ideas?
Hi, I’ve just tried rooting my Nook using this guide and NookManager said that it was succesful. However, upon rebooting I can’t see any visible change to the screen nor can I do anything extra. Am I missing something here?
Hi. Similar issue to the person near the top of this feed. Have rooted fine with NookManager, but it never gives an option of ‘Custom’ to point it in the direction of the NTGAppsAttack zip file. Version of file is the same as NookManager. Any thoughts anyone ?
I had this problem too. Extract the NTGatppsAttack attack folder, to the computer first, perhaps to the desktop, or a Nook folder, or anywhere else you can find it. Go to the unzipped NTGappsAttack folder, that you have just extracted, and open it. Inside that folder is another sub-folder called custom. This is the folder you need. Copy/paste or drag and drop that custom folder to your Nook Manager SD card (don’t open it any further), then re-insert the Nook Manager SD card, and boot up, following the rest of the instructions. You will then find the Custom folder in the options, and you can progress normally from there.
So extract the NTGappsAttack folder to the desktop (or wherever you like) open the NTGappsAttack folder, select the Custom Subfolder, copy the Custom Subfolder to the Nook Manager SD card, and carry on from there. I hope this helps.
I have to thank you for this comment (even though you wrote it months ago). I couldn’t figure out, but you cleared it up. Thanks!
Many thanks for this Matthew, just completed after a few hickups, Just installed Airdroid and think it will be useful, use it with my pad, CoolReader & Moon+Reader are interesting, one will get to stay.
@alan – I used NookManager as above then overwrote the custom folder with the custom folder in theNTGAppsAttack zip file, rebooted with the sd card, custom is an option on one of the side buttons, possibly after more, installed the market, then quickly logged in and downloaded an app as above.
Now market is installed finding installing from a pc & google play easier, but not all apps seen as compatible with my ‘phone’, not tried sideloading yet
As above, this transformed a 29quid nook, more pictures in the blog would be a nice touch.
Hi MickJ,
I tried to install Moon+ on my rooted NST but without any luck. The AppStore won’t let me and all the sidloading i tried – didnt work.
Can you tell me how you did it?
I couldn’t download MoonReader+ to my rooted nook, but was able to load CoolReader, which lets me read books not acquired through B&N or Amazon.
Many thanks, have been successful in rooting after following your instructions, and have installed the NTGAppsAttack package also.
I have been trying to install the Searchmarket app using the browser on the Nook, but when it says – “This will be installed on your device”, it is then installing the app to my Android mobile (I used the same gmail account for both)! Any ideas what to do to get around this?
I’ve answered my own question after doing more reading – there’s a dropdown list for ‘devices’ and you select ‘phone’, which installs to your Nook…
Another question though – I’ve read about an app called NookColorTools which allows you to configure installation of non-Market apps – I can’t find this app on my NST, is it from an older/different incarnation of Nook Manager? I’m trying to install an older version of Aldiko (as the current version doesn’t work)…and will be trying the same for Evernote….. Any advice would be much appreciated!! 🙂
Katy, I just downloaded to my pc from http://www.freewarelovers.com/android/app/aldiko-book-reader version 1.2.6 for no particular reason.
Popped the .apk file into my dropdox folder, I have dropbox on my simple touch, ran the apk, installed easy. hope this is helpful, I suspect this is sideloading, have a look at look at cool reader as well,
Mick
Thanks Mick, I’ve just managed to do this using the ‘installer’ app and copying the Aldiko apk on to my SD card first… got evernote to work via dropbox too,wouldn’t work via ‘installer’ method…I’m really chuffed!!
@MickJ Just followed your directions … worked perfectly. Many thanks.
Certificate warninig when entering Play Store a bit concerning, but downloaded an app no problem. Great stuff. Anyone else experienced this at all ?
thanks Matthew for the post, everything worked fine on 1.2.1.
I just want to make a few suggestion:
+ before rooting and installing the market read every step and details, here and on xda, AT LEAST ONCE. proceed only if you have understood everything of what you are going to do.
+ install apps from the browser on a desktop, it’s much easier. ANd it’s also useful to change the name ‘phone’ to something else like… NOOK? 😉 just go to “My orders and settings” in the market from the browser and click the tab “settings” then click the name you want to change, in the end click update on the right
+ if you lack space on dropbox you could try to use Copy 22GB free from here http://copy.com/?r=1CYg4t
I have had a strange side effect. i used a 16gb card to write the nook manager. I used win 32. the image file is 64mb. now the card says it is only 62.3mb. even if i try to format it it still says only 62.3mb avail?
what have i i done wrong? more importantly how do i undo this error?
My nook crashed badly during the process. it was running too slow and the charging light stayed on so i did a factory reset. going to try again today…
I have my NST all rooted nicely now. thank you so much for your previous advice. even easier the second time. just waiting for Google market to kick in.
I used the same sd card, again, no problem. but it still says 62.9mb at the end of it all. I thought doing a rewrite might help. it didn’t. any ideas?
When you use an image writer, it takes the card and “formats” it to the size of the source image. It “becomes” a 128 mb (I think it is) image. Have a look at this link – http://www.makeuseof.com/answers/recover-space-lost-usb-drive-install-linux/ – Which might help.
Thank you so much! My new superfast cards are back! now I have a rooted Nook and loads of space to put my ebooks.
I went to the first link you recommended and tried using Windows 7 Disk Manager but this didn’t work. Then I followed the link on that site and ended up with http://download.cnet.com/Easeus-Partition-Master-Free-Edition/3000-2248_4-10863346.html (via Cnet) to repartition my drives, paying attention to go without installing all the adware.
I did wonder why you used a separate 2mb card for the installing but I understand now.
I suspect I will not be the the only one with this problem as more nooks get sold and rooted; lots of us n00bs out there who only half understand what we are doing.
Cheers. You have been most helpful (and speedy) with your reply.
Laurel.
The official SD card formatting utility at https://www.sdcard.org/downloads/formatter_3/ is a good choice if you want to regain free space on your SD card, if you don’t need a full partitioning app.
P.S. Thanks for this guide – got my NOOK up and rooted in no time!
You can use the Windows utility “diskpart”, but that’s a little more complex – try the above first and see what happens.
I am trying to work up the courage to root my Nook Simple Touch with Glowlight. Does it make any difference that mine is the Glowlight version? Also I have windows 7 64 bit. Should everything work as in your directions?
According to NookDevs, the glowlight uses a different uRamdisk file – I assume that unless Nook Manager can pick up that your device is a Glowlight, rather than a Simple Touch, and patch uRamdisk accordingly, this method won’t work.
http://nookdevs.com/Nook_Simple_Touch/Rooting/Manual
Just another “Thank you” for this article – rooted my Nook ST yesterday, and loving the versatility of the device.
Not sure if anyone’s trying to get Kobo to work, but the version I downloaded from the Market crashed whenever I tried to load a book on my Nook.
Sideloading Kobo 3.2.1500 worked for me – apk at http://www.freewarelovers.com/android/app/kobo
Think I’m having the same problem as James, rooted my Nook ST with no probs and everything seem to work ok but upon installing Kindle it refuses to connect to Amazon and just sits there saying “retrieving archived books” which it never does. The Kindle store link comes back with web page not available and the Amazon App Store doesn’t show any apps available either, its like Amazon have blocked the Nook! I’ve tried the Kindle app direct from Google Play as well as sideloading various older versions, any ideas how to fix?
Forgot what I just said, it’s suddenly started working after visiting Amazon.com in the browser!
No, I spoke too soon, still not able to read a Kindle book. I eventually got a list up of my books but downloading any sticks at 0%. Tried reinstalling an older version once more and I’m back to the blank archived items screen! Anyone got any ideas? Tried it both with and without SD card.
Would someone be able to do a step-by-step idiots guide on how to install NTGAppsAttack for those of us who are complete technology novices and don’t understand all the jargon of the xda forum? 🙂
Never mind, I managed to successfully root. Although amazon apps is telling me it’s not available in my region, is there a way to fix this? Also can anyone tell me if I need to be careful of the nook autoupdating? Will this ruin the rooting? Thanks!
Hi, Does anyone know if you can UN-ROOT a nook simple touch, or is there a way of temperamentally turning it back into a stock nook? If there is a way can someone please tell me, or send a link, or something please?
Thank you.
Hi Naeem,
To get it to behave like the standard Nook, when you hit the “home” button, if you select home, rahter than Relaunch, this will take you to the stock Nook screen.
To completely unroot it, you could try the instructions at this link:
http://forum.xda-developers.com/showthread.php?t=1289233
Just an update – There’s content that doesn’t work on the Kindle touch as well as the Nook. There’s no clear reasons why, but it’s newer content as a rule.
As a result I’ve ended up buying a Kindle Fire for my daughter but keeping the Nook for me 🙂
Hi Matthew, thanks for a great article.
I’ve successfully rooted my Nook ST, however when I try to install Overdrive or Aldiko from the Google Play store it as says they’re not compatible with my Nook. I have other apps installed on to my Nook from Google Play so it I know it’s set up properly.
I’ve also downloaded the APK’s onto my NOOK however when I try to install them I get the message; “There is a problem parsing the package”
Any ideas?
I managed to sideload Aldiko 1.2.6 found at http://www.freewarelovers.com/android
perhaps an older version will work for you
Hi, I’ve managed to root my Nook and installed some apps on it. Thank you for supplying this guide.
Do you know of any way to get ReLauncher to go straight to the applications view? There are quite a few screen presses involved to get from Nook screen to applications view I would like to reduce the number of button prresses if possible. To one if at all possible.
Thanks.
I just purchased a Nook Simple Touch. Thank you for this fantastic article and tutorial. Do you have to have a rooting tutorial video as well? If not, do you know which one on YouTube is the best / easiest?
Cheers!
I have tried rooting my nook twice now, but like some people at the beginning for this thread I do not get prompted to sign into my google account. I have tried looking in the settings but can not find anything. can anyone please help? just in case it makes any difference I am in the UK.
I am writing to say I have finally managed to fully root my nook and install google market following instructions listed above.
For anyone else doing the same I was not asked to sign into my google account at the end of the first process but decided to continue on anyway.
You need install the NTGAppsAttack using the same sd card as you still need to nook manager for it to work.
Hope this helps someone and Thank you to Matthew for posting.
Thanks! Good work fella. I wanted to use my Nook to read .PDF files (Magazines etc.). Using your instructions my Nook Simple Touch Glowlight (firmware 1.2.0.) is now rooted. It took a few hours for things to settle down and I am still not entirely sure things went perfectly, but it works and I am happy. If anyone is having issues my advice would be to be patient, give it a few hours to sort itself out. I am a Semi-Tech-Noob with no knowledge of ‘Android’ stuff, but managed to install a couple of apps (Opera Mobile Browser and Apv PDF reader).
Thanks! I was able to use these instructions successfully on a nook with UK version 1.2.1.
I have still to explore a bit to find apps that work well with the E-ink screen, but looking forward to doing so. Screen navigation seems to be a bit of an issue on some apps (e.g. BBC News app), so I may investigate “Button Savior” which is effective on the button-poor Joggler that I use.
For those looking in detail at the Nook Manager/NTGAppsAttack instructions:
I left “backup to Google servers” checked and it did not seem to cause any harm. Have yet to see if the settings to actually get backed up like on my other Android devices.
I used a different Google Account from the one originally used to sign up the Nook (which I think everyone suspected would be okay, but just had not tried)
Thanks, Matthew.
Dear Mathew,
Amazing! Haven’t had a chance to say “Nook Simple Touch” and I had it rooted. Fantastic. Thanks for you and all the Developers out there. Great Job.
I have a lot to ask but I’ll start with this one:
Does anybody know how to make the Nook display (and for me to read) Hebrew characters?
Thanks again,
The Web is awash with rumours (possible false) that the Nook Touch is about to “auto-update” to a new version of firmware that allows access to the original browser and an email client. Does anyone know how this will affect already-rooted Nooks? I’m assuming that a rooted 1.2.1 with a choice of browsers and readers has got to be better than a B&N Nook with access to just the stock browser, and maybe email, enabled.
Hi. Thanks for this guide. I rooted my nook using Nook Manager and now have the web browser and the amazon store. But I have no idea how to get the kindle app installed (i can’t see it in the amazon store). I’ve tried downloading it from within the nook browser itself (via amazon and also from other sites) but although it downloads, it fails to install/launch. If I tried to install google play would that need to go on a clean sd card (I want to keep the sd card with the rooter image on it in case I need it again!) Can anyone please help – I would need a step by step as I’m completely new to android…Thanks.
Hmm, I get ‘The Amazon Appstore is not yet available in your region’. Rooting was the easy part. I’ve spent HOURS trying to download Kindle. This is very frustrating. I must be missing something very simple?
Sam – Maybe you would have more luck using the Google Market. I proceeded with the NTGAppsAttack instructions (that Matthew refers to) after rooting and was able to access the Google Apps Market. I have had no problem downloading all sorts of apps – although Kindle is not one I have tried. Good luck!
SteveC thanks for they reply. I managed to get google play installed and now have the kindle app. Finally!
Great! Does the Kindle App run well on the Nook? Presumably it is intended for reading Kindle material on a regular Android phone or Tablet. How’s it look on the Nook?
Hi steveC. It does work on the nook and sync’ed my books with no problem. But to be honest I’m not thrilled with the interface or the black homescreen background. I used the kindle app from google play. There are others kindle versions out there which can be sideloaded and are more suited apparently but I ran out of patience. At some point i’ll be looking to change it. I’m new to android and eink readers so I could be being very fussy.
I bought NST primarily to use it as an e-reader. I have rooted it, however, I have tried all the PDF apps, but nothing works smoothly; none can highlight texts, which is essential for an academic like me. Hence, planning to revert back the NST to its original state. Has anyone found a good PDF reader that can highlight texts, or highlight text in any other format?
No, I have not found the ideal PDF reader yet… but I don’t understand why you would need to revert to the pre-rooted state to use the Nook reader. You should be able to use the original reader on your Nook pending finding a better one. If you set up the buttons in the way I described in a previous reply, you’d hardly know it WASN’T an unmodified Nook, but you’s still be able to try other PDF readers as you find them (surely you have not tried them ALL 🙂
Sarkar, I find ezPDF Reader to be ideal on all my Android tablets (ZOPO ZP950+, Google Nexus 7, Google Nexus 10 and Nook Touch Glow). It is not free, but well worth the price I paid for it. It is about 30% faster than Adobe Reader (very important for searching, as normally searching a PDF file is impractical, e.g. if you have 10,000 pages, as a in a typical book optimized for 6″ device, see http://www.bibles.org.uk/study-edition.html)
I am going to buy Nook Simple Touch for £29 for the sake of rooting it as well. (and giving to someone as a gift, as I have too many eInk devices already 🙂
Hi,
After successfully rooting mynook I tried to install NTGAppsAttack.
To do this the instructions say “extract the NTGAppsAttack zip to the root of your Nook Manager SD car”
The problem is there is not enough room on the SD card.
I am using an 8GB card but after writing the Nook manager image it is now 62.9MB – not leaving enough room for the NTGAppsAttack files.
Do I need to use the Nook Manager SD card or can I use another blank card? or I can reformat (SDFormatter) the Nook Manager Card to full capacity.
If I do need to use the Nook Manager card how do I resolved the space issue?
thanks
8GB is more than sufficient.
I carried out the whole rooting and NTGAppsAttack process on 3 Nooks using just a 2GB card.
I’d check that you’ve formatted the card correctly using SDFormatter.
I had the same issue with my card. apparantly its a matter of partitioning. the nook manager makes a partition of 62 MB. you can either delete it or name the other partition using the device manager in orfer to make it work.
see here for example: http://www.winability.com/delete-protected-efi-disk-partition/
Chen .. I do not quiet understand what you are suggesting.
The partition created by the NookManager image is 62MB so I cannot fit the NGAppAttack on that partition.
Others are suggesting that they could.
Am I missing someting?
I followed all instructions exactly but when I go to unzip to the root of the sd card there is not enough room.
Sorry for not answering your question, Pablo.
I can tell you that i did as it was told, using an 8GB sd card and had no problem.
the thing is, you have to have your NGAppAttack in your Nook Manager folder since it opperates through it.
I would suggest you start afresh: install nook manger on a new (or your used, formatted) card and try again. make sure you connect it to your computer using a card reader and not with it inserted in your Nook.
does Nook Mahager need to be installed on the sd card yiu copy NTGAppsAttack to?
thing is when you install Nook Manager on the card it creates a partition of 62mb which does not leave room for NTGAppsAttack .
I can reformate the card to 8gb but then Nook Manager is gone.
So, It seems I cannot have Nook Manager and NTGAppsAttack on the same card as suggested in the install method listed here.
After running nookmanager I overwrote the custom folder with the custom folder from the Gapps, then was then able to step through and install the market. I don’t know if just adding the files together will/would work.
I think there is a bit of magic and smoke involved, had more than a couple goes at it.
I used an empty 2gb sd card I already had at home. I created the NookManager image, inserted it into my simple touch and immediately backed up using NookManager. Then I took the sd card out of my simple touch and via the pc unzipped the NTGAppsAttack file straight to the root of that stick with NookManager still on it. No formatting, no deleting. So NookManager, a back up of the stock os and the NTGAppsAttack does fit and doing it this way does work.
Exactly the same scenario here. 2GB card, NookManager, Root, Backup (goes to the second partition, I believe), Unzip NTGAppsAttack to root directory of card, etc. Worked fine for me
OK …Got it. I was unzipping using the right click (context menu) in Windows 7. However this was working it was claiming there was not enough space. I unzipped using 7-Zip and all is good.
Hi, I am trying to download the Win32 Image reader, but the site you provide a link to shows this message:
“This program was initially written to fill a need for Ubuntu Jaunty (9.04) Netbook Remix. Recently, it has grown in popularity for other project developers, namely Arm development projects (Android, Ubuntu on Arm, etc). Anyone is free to branch and modify this program. Patches are always welcome.
This project is currently being migrated to Sourceforge. Please be patient.”
Is the download button somewhere I cannot see it or is this a recent thing?
Sorry if this is a stupid question – I have no idea what I am doing with this whole process and am desperately hoping it works!!
Downloads are now on Sourceforge only.”
Oh dear, it seems i’ve managed to make my previous message make no sense at all. Sorry.
The win32 image reader site says this:
This program was initially written to fill a need for Ubuntu Jaunty (9.04) Netbook Remix. Recently, it has grown in popularity for other project developers, namely Arm development projects (Android, Ubuntu on Arm, etc). Anyone is free to branch and modify this program. Patches are always welcome.
This project is currently being migrated to Sourceforge. Please be patient.
Downloads are now on Sourceforge only.
My question is, is this a permanent message and I just cannot see the download link, or, is it a new message that means I cannot download it?
Thanks.
Oh gosh! I am so sorry. I have had a long day! I have found the download link. If you have the access to delete my comments then please do. Sorry again.
Charlotte: Try http://sourceforge.net/projects/win32diskimager/files/latest/download I believe that’s the link I used. I already had it on my machine for rooting something else when I came across Matthews article. BTW: The warning about not using the SD card slot on a laptop seems to be correct in my case. I was able to write to my micro-SD in an SD adapter in a USB adapter – but not without using the USB adapter. No go in the SD slot on the laptop.
You might want to point out that to power down your nook you have to hold the power button for three seconds. I had no idea.
Much better instructions here: http://geekanddummy.com/how-to-rooting-the-nook-simple-touch/
Regarding: “Requirements, An external micro-SD card reader…. You can pick up one at Amazon for about £1”.
My local “Pound Store” had SD readers – and a lot of Micro-SDs come with a Micro-SD to SD adapter.
mac users – DO NOT try to make the image on your sd card with disk utility. it DOESN’T WORK. the nook ignores the card and boots normally
use http://www.gingerbeardman.com/dd-gui/ and all will be well.
NookManager would not load on restart at all until i used dd to make the image.
Hi Guys!
This seems to be a great guide for rooting the devices – I will try it later this evening, when the wife’s away… 😉
Just wondering – how much does this affect the battery life?
I don’t use the nook that much and therefore have great battery life on it at the moment.
I would be greatly sad, if this would be reduced..
Best regards
Jeffrey
This question relates to all who have rooted their nook simple touches….I am considering rooting my nook touch with glowlight. My only concern is what happens to the battery life once rooted. Right now my nook glow has fantastic battery life….will that be affected, and if so, by how much????
(1) I have not noticed an appreciable decrease in battery life. Of course you may use the Nook more after rooting it! And wi-fi gets very little use on an un-rooted Nook… but more on a rooted one… As long as you turn off wi-fi when not using it you should be fine. (2) It is easy to put the Nook back to factory state, so if you are dissatisfied with the battery life after rooting it it is not a big deal.
Has anybody found a way of getting the Google Books app to run on a rooted Nook?
Just started using Google Books on laptop and kitkat tablet, searched around and found com.google.android.apps.books_v1.3.5.apk an older version of Google Reader and side loaded it on to both my touch & glow.
Did see references to v1.4.5 but was unable to find a copy. 1.3.5 works, but basic, able to download my books, open and read, text is fixed and seems like reading 10pt text, page turn works, saves my place etc, pleased with that.
Tried to sideload blinkboxbooks .28, the tesco app but nook reports parsing error.
Hi I follwed your steps on how to root the nook st all went fine until I tried to install the GApps thing now it is blank. (Its fine ok as long as the SD Card is NOT in it,)
When I was trying to install the GApps I tried to extract all into SDcard. and cut and paste. I then tried to get rid of the cut and paste by deleting it but maybe I didn’t do that or got something wrong
Can someone please please help me I have been looking for like 4 days and really have no clue on what I am doing.
Many thanks
Hi me again, I formatted the memeory card. Then I re rooted the nook using nook manager. All was fine until the NGTAppsattack. Which I went to downloads then clicked on it then extract all to f; (the usb card reader with nook manager on it) had a warning about there being a custom file already on the card, I went ahead. Booted up the nook and nothing it doesn’t go blank but no nook manager menu either
So I can’t compleate this step. “From the main NookManager screen select More, then Custom, then Install NTGappsAttack
If all goes well, select Back, Back, Exit, eject your microSD card and let your Nook boot”
Please help I am really getting to the end of my teather
The NST only runs Android version 2.1. Most new apps won’t run on an old version of Android. I found a site that archives old versions of apps, so I usually use this when I want to install an app. The website is:
http://www.androiddrawer.com/
For those who had trouble finding the Custom option on their Nook, after trying to install the “NTGappsAttack” folder, I had this problem too. Extract the NTGatppsAttack attack folder, to the computer first, perhaps to the desktop, or a Nook folder, or anywhere else you can find it. Go to the unzipped NTGappsAttack folder, that you have just extracted, and open it. Inside that folder is another sub-folder called custom. This is the folder you need. Copy/paste or drag and drop that custom folder to your Nook Manager SD card (don’t open it any further), then re-insert the Nook Manager SD card, and boot up, following the rest of the instructions. You will then find the Custom folder in the options, and you can progress normally from there.
So extract the NTGappsAttack folder to the desktop (or wherever you like) open the NTGappsAttack folder, select the Custom Subfolder, copy the Custom Subfolder to the Nook Manager SD card, and carry on from there. I hope this helps.
Hi,
I have successfully rooted my NST using the instructions here. I haven’t yet installed the google app store as I don’t have an account there and believe that is a prerequisite.
However, looking at the apps that are pre-installed, I can run the browser. When I try to connect to something like mail.yahoo.com, I can’t log in as the on-screen keyboard doesn’t have a “.” (period / full-stop) key. Any clues ? I have seen when entering a URL that there is a “.COM” key which I can subsequently edit back to a just a “.” but this key does not appear when trying to enter username and password. This is extremely limiting. Are there any options such as alternative keyboards (e.g. Swiftkey) ?
Thanks for all the advice.
S.
It is the Question Mark Button!!!!
That had me wondering for a little bit at first, too. They made it look like a weird cross between a colon and a question mark. 🙂
Duh !!!
Thank-you.
I am not sure how common this problem is – but my wife dropped her Nook and it completely stopped working. It turned out to be nothing more complicated than the battery connector coming unplugged. I don’t know if this happens often or whether she was just incredibly unlucky to hit a particular corner of the Nook.
Be sure to look at the “how to open” videos on the web – otherwise you might break the case. It isn’t hard to undo, but not obvious without seeing it. You’ll need a No. 5 Torx and a flat-bladed screwdriver.
The symptoms of an unplugged battery are: Nook displays whatever screen it was last displaying when dropped and won’t turn on; PC can’t see the Nook as a USB drive when plugged in – asks for an OMAP 360 driver instead.
I did think of trying to secure the plug better – but ultimately decided against adding glue or tape. The Nook is quite easy to open if necessary. Perhaps I will change my mind if it happens again!
Is anyone aware of a way that I could use my rooted nook simple touch as a wifi second screen for an android phone or tablet. Ideally it would act as a remote touch screen as well.
I know response times are too slow to watch movies but out in the open it could be visible as a bike gps etc and is cheap enough not to worry bout using it on the beach while leaving the expensive phone / tablet safe in my bag
On Google Play there are a couple of Apps called “Display sender” and “Remote display” that sort of sound like the sort of thing you want. I have not tried them. Basically, it sounds like you want “LogMeIn” or “Windows Remote Desktop” functionality, but with two Android devices instead of PCs.
On closer inspection, it looks like maybe it is only a small part of what you want. Maybe there is a VNC port for Android?
Yup…. on Google Play there seem to be both VNC Servers and VNC viewers – so in principle it seems like you might be able to do what you want. Actually getting it up and running with a working touch interface might be a bit of a challenge, though. Please do re-post if you do any experiments.
Thanks Steve
I already use teamviewer from my tablet when away from home .
I will have a look at working it the other way round with one of the lighter VNC servers / clients.
Will let you know how I get on – may be a while ……
I expect that it will need to be sitting on a Wi-Fi network rather than peer to peer Wi-Fi – any thoughts ?
Yes, probably – although it might be possible to use the phone’s built in hotspot somehow. But I have only ever used my phone’s hotspot while not actually using any other functions of the phone, so I’m not totally sure about that. Anyway – of all the crazy things I have thought about doing with my Nook, a screen extension for a phone is actually a pretty sane idea. Most other ideas (other than reading books) tend to look a bit daft if you have a smartphone in your pocket. However I do feel driven by the idea “it cost £30, what _can_ I do with it”. 🙂
great work!
I’m wondering if you can install yabse and use the nook as an xbmc remote controller… Has anyone tried this? It seems like a perfect solution with its great battery life and all..
I could not see it on Google Play, so unable to try it for you. Unfortunately, it is not just a matter of “will it run” but also” is it practical to use the color scheme on an e-ink display”. Quite a few programs WILL run, but are unusable in practice. Easiest thing is just to try it. As pointed out by someone above: The NST runs a very old Android version. Many newer versions of Apps won’t run on an old version of Android. The previous poster (Anonymous) recommended http://www.androiddrawer.com/ as a source for old versions.
If you mean “Yatse” then the version on Google Play is not listed as being Nook compatible. If you can find an APK of an earlier version you may be in luck.
Hi All! Just got myself a NookST and like it a lot. Am thinking of rooting it using the instructions here. Before I do, I’m curious:
Has anyone here loaded the 3M Cloud Library Android App on their rooted NookST? If so, is it usable?
Thanks!
https://play.google.com/store/apps/details?id=com.txtr.android.mmm
This says it requires Android 2.2 or higher.
I have not found anything that I can run on the Nook to actually check out the library books right there. The way I access library books is with a Browser and Adobe Digital Editions on a PC. Then I just drag the books over to the Nook (which, like the PC, has been authorized using Adobe Digital Editions on the PC) via cable. Not quite what you are looking for… but 3M Cloud Library _does_ seem to just use A.D.E. “under the hood”.
Ya. I have an old old old (relatively speaking) HTC Android handset on which I use both 3M Cloud app and an Overdrive app. Mostly I use the Mac versions of those things to checkout books and move them to my device. Interestingly, with 3M, one can only return books “early” with the “mobile” apps.
I may have missed the answer above, what version of Android *is* running under 1.2.1 Nook firmware?
… I have never been able to figure out the actual version of Android – but it is something _real_ old. Once you are hooked up to the Google Market you can use the usual Google Play mechanism to peruse and download apps in the browser on your PC. Compatibility with your Nook (or “phone” as it will initially be called) can be determined from there. And, as already posted by someone else above, there are places where you can obtain APKs for older versions of many things if required.
Hey pal, how are you doing? Nice Blog by the way!
I would like to ask you something… I live in Germany, but I´m Brazilian. I speak English and German, but you know, not as good as I dreamed of. Therefore, I need dictionaries on my eReader, especially an English-English and German-German to widen my vocabulary. Could I install both? And how a dictionary works here? You can stress the word and the meaning just shows up? I never had one before… But I want force myself to read more literature, so as newspapers´ articles etc. And what about PDF articles or DOC files on Internet – can I read them as well?
Thank you very much for your attention and have a nice day!
Greetings,
Fabricio.
Fabricio;
I, too, would be interested in knowing how to install other language Nook dictionaries (where to get them from and how to install them). I read a little German and Dutch so it would be good to be able to use the Nook’s integrated word-lookup facility in other languages. I can see where you can select the dictionary to use, but not where to get new ones from. In lieu of an integrated solution I have some quite good off-line dictionaries installed – but it is not as convenient as using an integrated look-up.
The ones that I currently use are “Quickdic” which works passably well on a rooted Nook.
https://play.google.com/store/apps/details?id=com.hughes.android.dictionary
Some software people have been experimenting with converting various dictionaries to the Nook format. Sounds like it is possible to use the native lookup mechanism with a converted database – but I have not read enough to understand how mere mortals might achieve this.http://forum.xda-developers.com/showthread.php?t=1477918
The latest post on that thread seems to be about 6 months old. At that time, it looked like developers had a way of converting dictionaries, indexing them, and patching Nook software to read, and even switch between, dictionaries. Even translation dictionaries e.g. Polish-English. However it looks like it requires extensive knowledge of the Android development environment. Although I have successfully compiled and run a “hello world” application just to see if I could do it, I really don’t want to embark on a new career as an Android Developer :-). It is a pity there are not other dictionaries available for the Nook – I would imagine that there would be a paying market for translation dictionaries that integrate with the Nook word lookup mechanism.
Wow, your replies are really detailed! Thanks a lot. I will read it carefully as soon as I have enough time to get a look over all the Adroid references.
Anyway, thanks a lot!! Now I´m in doubt if I should buy a German or a “English” eReader. This Nook looks really beautiful and is cheaper than the German ones. I even thought about buying this Nook Glow Light… but in many reviews, people related they got a hole on the screen, where the light scapes through.
Thanks Steve!
Well, the main reason to choose a Nook Simple Touch over any other eReader is simply the price: £30 in the UK (€35). At that price, I’m willing to accept some limitations. However, if I were spending £100 to £200 on an eReader I would definitely want to be able to use bilingual dictionaries in an integrated way. Good luck! 🙂
Just a last question: is it not a problem not being able to read in the dark with your Nook?
When I first saw a Nook, I wondered whether the contrast would be adequate. There is no doubt that the display is very dark grey on very light grey rather than black on white. However, I’m pleased to report that I have found it very usable in practice. Great in sunlight, of course. I have used it on the beach with no shade – wearing sunglasses. No problems. I frequently use it with a relatively low light from a wall lamp in my bedroom or living room. My wife uses hers sometimes in a dark room with a cheap book-light clipped to it and finds this just fine – although I have not tried this myself. Mind you, the choice between the Nook Simple Touch and the Glowlight version is easy to make here in the UK. The backlit version is 2.4 times the price of the NST !!!
Hi Matthew,
I don’t really know if I’ll get an answer from you, but I’ll try:
I want a Nook Simple Touch but I cannot try it first since no store in Portugal sells it, hence my question: I intend on using the Nook for reading purposes only, but I have a lot of illegal .epubs and .pdfs that I want to use with it. Do I still have to root my Nook for that or I’ll be just fine?
Thanks in advance,
Afonso
Hi, I got a Nook simple touch a couple of months ago which thanks to your amazing article I was able to root to open PDFs of screen plays.
I’ve just gone away for the weekend and turned my nook on to find it is suddenly restored to factory settings with all side loaded content gone and no longer rooted.
anyone else had this happen?
Hey guys,
Thank you for a clear tutorial and well-inspired additional comments. I have just rooted my nook and the process worked smoothly. Moreover, I have to admit that it is quite an achievement for me, as I am not preoccupied by all this IT and computing stuff.
I still have to install the NTGapp, but I will probably leave it for tomorrow.
Thank you again!
Hi Matthew,
thanks for the guide. I wish I’d found it sooner.
All went well with my rooting but I cannot install Dropbox via the play store. Maybe it has been updated since your post and now it’s not android 2.1 compatible anymore.
Do you know which version of Dropbox I can install? If you happen to have the apk, even better.
try one of these
http://www.freewarelovers.com/android/app/dropbox
I rooted my device recently and installed Cool Reader what turned my Nook into an “e-bookissimo”. Cool Reader is the best choice (freeeeee!) if you want to read epub (non-DRM), fb2, doc, txt, rtf, html, chm, tcr, pdb, prc, mobi (non-DRM), pml formats without converting. Many languages, a lot of fonts, hyphenation dictionaries etc. Make sure of downloading the latest version. Best regards from Hungary! 😀
Hi,
I have nook simple touch just rooted and i want to use it to read pdf file BUT i want to be able to highlight and keep notes. The thing i want to be able to zoom and the nook to “fit” the page to its screen AND not to ruin tables. Any opinion?????
Thank you very much.
Hi, thanks for posting and i’ve followed your instructions. but after rooting, every time i pressed n button, there shows a big black cross on each ions,
could you please tell me what’s wrong with it and i’ve tried to rooted it again but it still there, and also then same thing on the ‘setting’
Has the Nook STG come to the end of it’s rooted shelf life?
I’ve just bought a new NSTG and rooted it via NookManager and installed NTGApps. However it seems that the majority of the apps via Market Place and Amazon Market just wont run.
Ideally I want to get wireless book syncing working (I believe it’s possible via Dropbox and Calibre and another eReader such as Aldiko or Moon+). However all these apps fail to load or install. Either saying their incompatiable with my device or simply crashing on startup. And after searching high and low have been unable to find any working APKs online.
Syncing books via an external SD card is inconvinient and when I’ve read books directly from the SD card the Nook reader never seems to store my bookmarks and notes. Which is annoying. Though maybe I’m missing something?
Am I going crazy and missing something as it’s only a 6 months since this post was made and most of the reasons for rooting the device are redundant?
Seems like getting brand new Kindle might be the better option?
Could not resist a Glowlight at a knock down price, NookManager worked just like on my simple touch, am having the usual problems with the market, managed to place an old dropbox app into google drive and sideload, then tried V3.2.3 and installed without a problem.
Hi! Everything is working but the font size is really small. If there any way or app that will increase the font size. I am starting to get a headache!
Thanks, Doug
Loved your article. Just rooted my nook yesterday and I found the startup options very annoying. Now I can go back to reading as before on my nook. Thank you so much.
I have a rooted nook that seems to think it has no internal space available so i have not been able to add any apps. It is brand new with nothing on it except the barnes and noble stuff that came with it. any suggestions for how to find internal space? is it partitioned?
Hi,
I have a NST and would like to be able t send books to it from my tablet (the books are stored in skydrive) or if I root my NST would that mean I can download the books directly from skydrive?
I don’t want to have to read them from my skydrive as that would mean if I am out of WiFi/internet then I would be unable to access my book.
My books tend to be shared and are usually in epub or PDF formats.
Thanks.
I was able to do it as long as I had an SD card installed and I used one of the reader programs that by default copy any epub I open to their own directory. Dropbox (older version) worked the same way even without an SD card installed.
I don’t know what I am doing wrong. I have the 1.2.1 software. I downloaded the Nook Manager and then extracted all the files. I used the WIN32diskimager to write it on a micro-SD card that was inside an adapter. I put it in the Nook and powered up but nothing is happening. I checked and the Nook does show that it found the SD card so I’m not sure why the program isn’t working. Can anyone help??? Thanks!! ( I checked the card and the files are there)
I don’t know if it’s just me or if perhaps everyone else encountering problems with your blog. It seems like some of the text within your posts are running off the screen. Can someone else please provide feedback and let me know if this is happening to them too? This might be a issue with my web browser because I’ve had this happen previously. Kudos
Perhaps you could send me a screen grab showing the problem. You can send it to problems at this url
PS I edited your comment to remove your link as it was showing as being suspect
How were you able to get Amazon to let you send personal documents to your Kindle app on your rooted Nook ST? I have the Amazon app working for past purchased books, but my personal docs don’t appear. On Amazon.com, under manage devices, my Nook appears as a registered Android device but it lacks an email address like my Galaxy and iPhone kindle apps entries have. I used Nook Manager on my Nook STG 1.21. I tried the current Amazon app and the old 3.0.1.70 version. Ideas?
Hello, can I apply it with my Nook simple touch with Glowlight?
Did you have success with rooting your Glowlight?
Thank you for the rooting instructions, all went well.
This may be a duplicate entry as I did not look at all entries in the forum. All Nook owners would enjoy the free e-reeder management program Calibre. With it one can change formats between epub pdf and mobi as well as get metadata for most
e-books. Worth checking out.
http://calibre-ebook.com
Hi,
Do I need a B&N account to root the Nook? I don’t have one atm and am not that interested in signing up for one if it’s not required.
Andy
Can I ask your help please? What should I do, if my nook won’t start, while the microSD is inserted?
Just bought a nook, used, from a pawn shop on buya.com. I plan on rooting when it arrives. After hearing what some of you have said I thought I’d offer some advice about file viewing.
I recommend downloading ES File Explorer from Google Play. It is the absolute BEST file explorer which will allow you to swipe from internal storage to SD storage to Cloud storage to LAN Explorer to retrieve files from any computer on your network!!!
Happy Exploring!
Advice needed:
I am working with several other retired former software and EE engineers on a specialized system. It pretty much works fine except for the fact that it needs to have a fairly small display which can be read in bright sunlight. Having e-ink, Nook seems ideal.
The application runs with a set of sensors communicating via wifi to a host PC or Mac. We capture an event and display some results to the user. The host implements a web server which any user can log into via their display computer. This currently works well with tablets, smart phones, and laptops. Except they are tough to read in the sun.
In trying to get a Nook to work, we ran into two problems. Any advice? We’d be willing to pay for help. The Nook in question was a Nook Simple Touch with GlowLight and it had been rooted/jailbroken.
1) Our application runs “off in the woods”. There are no wifi or 3G services available. We use two Nano Loco wifi units to make our own wifi. (There are two of them because the two parts of our system are separated by roughly 600 yards and the Nano bridges this distance forming one seamless wifi net.) The problem is that the Nook will not support connection to a browser unless the full Internet is available. Even though our application does not use the Internet, the Nook seems to be unhappy if the Nook cannot see the Internet. By Internet, I mean the “upper_case” Internet: the world wide web. Yes, the Nano wifi units contain a full router.
2) No special app or software is used on the user’s hand-held display unit. All it need do is run a browser capable of displaying “stuff” which our web page host will create. To put that differently, our web page host essentially manufactures some Javascript and shoves it down to the hand-held. Our user sees a diagram displayed to him. In playing with a Nook to try to get this to work, the Nook attempted to install or load (not sure of the correct vocabulary) some sort of graphics software which would enable it to display what our web server sends it.
When using our local wifi network and we try to start the Nook browser, the error message is:
Application Sketch (in process com.sketchit.now) is not responding.
[ Wait ] [ Force close ]
When instead using any normal wifi network which DOES have access to the Internet, things work fine.
Any ideas would be great!
–jim hahn
Sounds interesting, try asking over on xda : http://forum.xda-developers.com/nook-touch
or that Onyx T68 ereader runs 4.0.4 and possibly a better browser – but at 149quid
Sounds to me as if “sketchit” is complaining because it cannot access its server. Looks as if you are running an application that expects to be online. This would, most likely, be because it wants to serve up advertisements or because it expects you to be logged in to your sketchit “account” for some reason.
Just started using Google Books on laptop and kitkat tablet, searched around and found com.google.android.apps.books_v1.3.5.apk an older version of Google Reader and side loaded it on to both my touch & glow.
Did see references to v1.4.5 but was unable to find a copy. 1.3.5 works, but basic, able to download my books, open and read, text is fixed and seems like reading 10pt text, page turn works, saves my place etc, pleased with that.
Tried to sideload blinkboxbooks .28, the tesco app but nook reports parsing error.
Have been advised that mapping a menu button (even temporarily) will allow changes to font etc.
Well that worked, ran Nook Touch Mod Manager app, mapped top right button to menu, opened google books app, pressed the new menu button and the options to change font size, go to contents, my books etc nice to have.
Peeps asking about Kindle apps on xda prompts me to link 2 here, both 3.2.0.35
http://forum.xda-developers.com/showthread.php?t=2268593
http://forum.xda-developers.com/showthread.php?t=2024062
other versions still available as above, http://www.freewarelovers.com/android/app/kindle
hope this is helpful 😉
первостатейный сайт http://partnerskie-programmy.net/692-nakrutka-povedencheskih-faktorov.html
It looks like the above guide does not work for firmware version 1.2.2. I tried modifying the rooting scripts to allow 1.2.2–the scripts claim they worked fine, but when I restart the Nook, it’s not rooted.